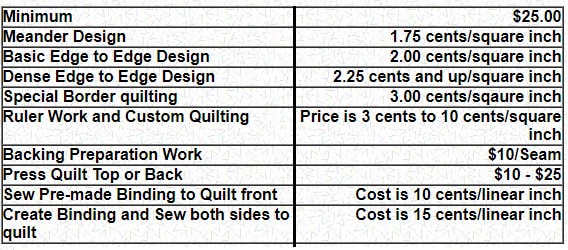
All longarm Edge to Edge quilting services include thread and quilting designs in stock. I have a large selection of computer quilting designs by quilting industry designers. We also carry basic quilting thread and batting. Special order thread request and quilting designs can be ordered with cost sharing by the customer. Minimum for set up and quilting is $25.00. Quilt Intake form can be found HERE. Some mobile devices do not show the Quilt Intake form. You can email a request for the form to email longarm@suzzettsfabric.com
Refer to the below table for basic pricing information.
Please give me a call at 214-797-0393 to discuss quilting services available. I am happy to offer you ideas on quilting designs available based on how you want your quilt to look. Pictures of quilts I have quilted are available on the Gallery link.
Tips for preparing your quilt for longarm quilting.
- Ensure your quilt top is near a perfect square or rectangle as possible. Verify the corners are square by using a square ruler or any piece of paper with a 90 degree angle. The best way to determine that your quilt is a true rectangle or square is to ensure that both horizontal borders measure the same size. Simply measure across the quilt at the 1/4, 1/2 and 3/4 points of the quilt to determine the width of the quilt. Take the average of the three measurements and create a border the size of the average measurement. Pin the border fabric to the quilt top at each end of the quilt as well as at the middle point of the border and quilt top, the 1/4, and the 3/4 points of the top and border. If you have a long quilt, add extra pins to ensure that you have centered the border across the quilt top. Sew the border into the quilt top. Repeat the same process for the vertical border. Take care to not stretch bias triangle when adding your borders. Borders sewn correctly will prevent a "wavy" quilt border.
- Sewing accurate 1/4 inch seams and pressing your quilt block ensures your quilt blocks are square and lay flat as possible. Make sure that fabric pieces are pressed to the darkest fabric when possible. When you do need to press to the lightest fabric be sure that the dark fabric is not peaking over the lighter fabric. Blue fabric peaking over a white fabric will show up more readily when the quilt is quilted.
- Trim all stray sewing threads as well as frayed treads from your blocks. Trimming threads as you go is a "best practice" when piecing your blocks.
- Stay stich your quilt border to prevent border seams from separating. This is especially important with a pieced border. Check your half square triangle for a 1/4 inch edge. You don't want to lose your points when you bind your quilt.
- Be sure and label your quilt front and back for the quilter if you have a quilt or backing with directional fabric. Just pin a label to the top left corner of the quilt top and baking indicating "top left side." Be sure and let your quilter know if it is important to you to have the backing centered to the quilt top.
- Your quilt back needs to be 8 to 10 inches wider and longer than your quilt top. Be sure to lay your quilt top over the quilt back just to make sure you have 4 to 5 inches of backing fabric peaking underneath all four quilt top sides. This way there are no surprises when you get to the quilter. Often it is necessary to piece the quilt back. You can sew the selvages seams together but you need to make sure that you are sewing at least a 1/2 inch from the inside edge of the selvage. Trim the seam to completely remove the selvage leaving a generous seam width. That selvage edge just seems to want to buckle up if you leave it in place. I personally like to remove the selvage before sewing the backing together. Press your backing seam open. The AQPS website has great information about how to sew a quilt back.
Be sure to check out the Gallery to see examples of our quilting.

